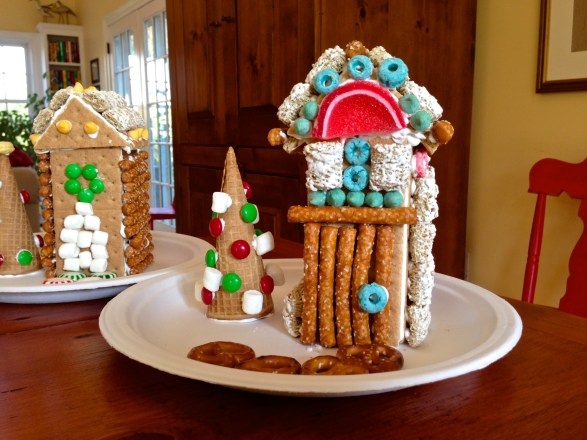
No-bake graham cracker houses are easier than their gingerbread counterparts but every bit as festive. The fun activity is sure to bring good cheer and enhance your holiday decor!
Making and decorating gingerbread houses has been a holiday tradition in our house since the kids were little. In the early years, it was more about making a mess and eating the decorations, but it has always been lots of fun.
When my older son began preschool, class parties came onto the radar. Knowing how much he adored making gingerbread houses, I figured the rest of his classmates might also enjoy this festive project.
Making twenty-some houses proved a bit overwhelming at first, and I wondered why the heck I volunteered to do it in the first place. But once I got into a rhythm, the task seemed easier. That’s a good thing, because once you offer to make gingerbread houses for the whole class, you unwittingly sign yourself up for every year thereafter!
Though I usually refer to these as gingerbread houses, they’re technically graham cracker houses. Despite the obvious shortcut in preparation compared to their baked gingerbread counterpart, we’ve always thought these houses look every bit as festive and fun.
Funny enough, our dog was responsible for the biggest snafu in house-making history. Angus, our faithful Springer Spaniel, never ate anything off the table. So when I returned home from a meeting and immediately spotted a trail of crumbs and empty plates on the floor, I was horrified.
Angus had pulled the houses from the tabletops on which they were drying and crunched through every last one. He was curled up in the corner looking guilty and quite ill. The thought of remaking all of the houses made me feel pretty lousy, too. So what’s a grown woman to do? Call her mom!
My mom came right over and gamely helped me remake every last house. We got a rather efficient system going and knocked out the new bases rather quickly, sharing lots of laughs in the process.
These days, I still make enough for my family and a few friends. The bases don’t take too long to assemble and can be made several days before being decorated. (During the years I churned out twenty-plus houses, I often made them up to two weeks in advance.)
You’ll need five and a half whole graham crackers per house. Sturdy white paper plates make a good base. After assembling the houses, there are usually lots of crumbs on the plates. I simply take them outside and blow the crumbs away!
Below is a recipe for simple royal icing, which serves as the glue, followed by helpful hints for assembling the houses. Younger children often do well using a smooth, plastic knife to spread the icing from a small cup or bowl directly onto the candy pieces. Older kids and adults can be more effective using a zip-top sandwich bag to pipe the icing as desired. Simply spoon the icing into the bag, and then cut a tiny piece off of one of the bottom corners (you can always make the opening bigger if needed). Squish the icing towards that corner, taking care not to exert too much pressure towards the opening, as this can pop the zipper seal.
As an added perk, if your little (or big) decorator loses patience and moves on to another activity, he or she can return to the project later. As long as the icing isn’t exposed to air, it can be stored indefinitely in the refrigerator. Just bring to room temperature prior to using.
Note: Needing a project for a Sunday school class one year, I made a stable and manger scene with the graham crackers and it worked quite well. I used the length of a graham cracker to make the stable and two graham cracker quarters shaped into a “V” for the manger. If you want to keep the sugar in check or simply enjoy a rustic look, pretzels, pecans, and shredded wheat squares are great options for decorating. Plan on extra graham crackers as there are sometimes broken ones in the box. Gluten-free graham crackers are also available.
Following is a photo illustration with more helpful tips and ideas included:


An old photo… 😊 ⇩⇩

Royal Icing & Graham Cracker Houses
Ingredients
Ingredients for the icing
- 1 pound confectioner’s sugar
- 3 tablespoons meringue powder
- 5-6 tablespoons warm water
- Optional: food coloring*
Ingredients for the houses
- Graham crackers (5½ per house but have extra in case some are broken or break while cutting)
- Sugar cones
- Sturdy, plain white paper plates
Decorations
- Candy canes, holiday colored M&Ms, peppermints, Fruit Loops, Frosted Shredded Wheat, short pretzel rods and/or miniature pretzels, mini marshmallows, sugar cones, whole pecans, dried beans, dried pasta, and any other items that look good to you. The bulk section of the grocery store and your own pantry are good places to look for inspiration.
Instructions
- Add the sugar, meringue powder, and 5 tablespoons water to a mixing bowl.
- Beat until the icing is thick and of good spreading consistency, adding a few drops more water at a time, as needed.
- If you mistakenly add too much water, simply add a bit more sugar and beat again.
- Store in plastic zip-top bags or in covered bowls. (For best results, press plastic wrap directly on the surface of the icing.) Refrigerate until ready to use. Bring to room temperature before using. The icing will keep for a week or more when sealed in an airtight container or bag.


Leave a Reply